SNMP on Cisco Small Business SF and SG series switches
Important things to know:- If you make ANY changes, save your changes using topic 'How to Save Your Changes' at the bottom of this page.
- SNMP is OFF by default. Use topic 'How to Activate SNMP - required for SNMPv1/v2c/v3' to turn it on, then save your changes.
- If you only need SNMPv1/v2c, you do not need to configure SNMPv3 and vice versa.
- To activate SNMPv1/v2c ONLY, use topic 'How to Activate and Configure SNMPv1 and SNMPv2c - Community Names', then save your changes.
- To activate SNMPv3 ONLY, start with topic 'How to Activate and Configure SNMPv3 - Engine ID and View ' and go through the rest of the SNMPv3 topics in order, then save your changes.
How to Activate SNMP - required for SNMPv1/v2c/v3
Problem: the Cisco Small Business
Series switches are not configured for SNMP by default.
Solution: follow these steps to
activate SNMP.
Procedure: Login to the switch using
your web browser. We have found Chrome to work the best
- the popup windows do not always work correctly using
IE.
Related
Topic:
How to prepare the Managed Switch Port Mapping Tool to
use SNMPv3.
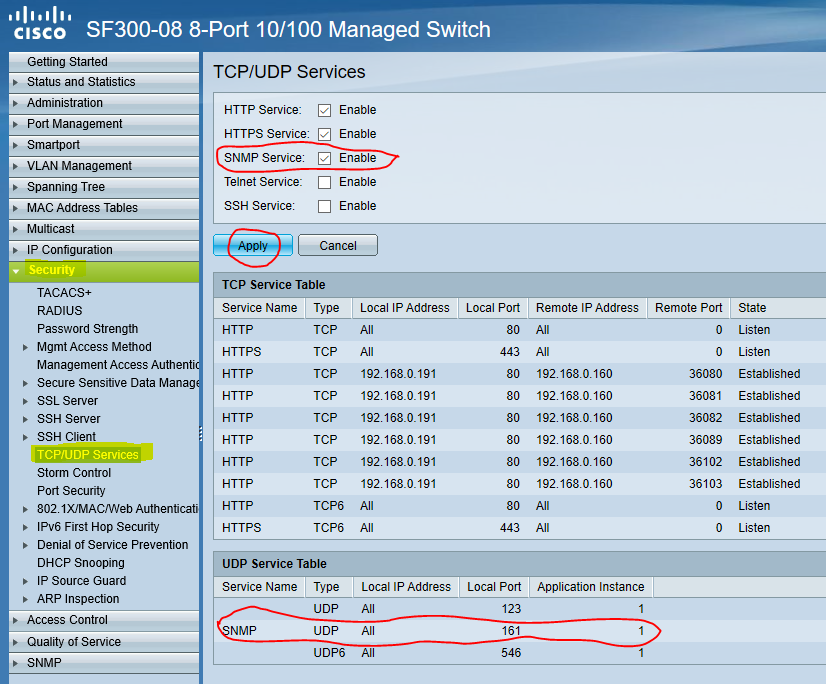
1. Activating SNMP
On the left side menu bar locate 'Security', 'TCP/UDP Services', place a tick in the box after 'SNMP Service' then press Apply. Confirm SNMP appears in the UDP Service Table.
How to Activate and Configure SNMPv1 and SNMPv2c - Community Names

1. Add a new SNMPv1/v2c Community Name
On the left side menu bar locate 'SNMP', 'Communities', Click on 'Add' to view this popup.

2. In the popup window select All.
Enter a Community String (like a password). Select Basic and Ready Only. Then press Apply.
3. Confirming the new Community Name
After pressing Apply, the new
community name should appear like the
highlighted one in the image.
Unless you need SNMPv3, you
are done after saving your changes.
To save your changes: skip to
the bottom of this page and do "How to
Save Your Changes".
How to Activate and Configure SNMPv3 - Engine ID and View
Note: if you have already activated SNMPv1/2 above, there is no need to go through this SNMPv3 configuration unless it is required by your network security policies. It is a complicated protocol and we strongly suggest using SNMPv1/2c for testing operation of our software with the switch.
Problem: the Cisco Small Business Series switches need to be configured for SNMPv3. We use the USM model.
Solution: follow these steps to
activate SNMPv3 after activating SNMP in the switch as
described above.
Procedure: Login to the switch using your web browser. We have found Chrome to work the best - the popup windows do not always work correctly using IE.

1. Setting SNMP Engine ID
On the left side menu bar locate 'SNMP', 'Engine ID', place a tick in the circle before 'Use Default' then press Apply. Confirm a string of HEX chars appear after User Defined. The User Defined option will now be selected.

2. Creating a View
On the left side menu bar locate 'SNMP', 'View', Click on 'Add' to view this popup. Enter a view name, select User Defined and enter 1, make sure Include in view is checked. Then press Apply.

3. Confirming the new View
After pressing Apply, the new view should appear like the circled one in the image.
How to Activate and Configure SNMPv3 - Groups

4. Creating a Group
On the left side menu bar locate 'SNMP', 'Groups', Click on 'Add' to view this popup. Enter a unique group name, select SNMPv3, check Enable box, check Read under View, then select the View you just created from the dropdown box. There are three combinations of Authentication and Privacy, this image shows one. You will need to do this three times if you want all three. Each one will need a separate group name. Then press Apply.

5. Confirming the new Group(s)
After pressing Apply, the new group should appear like the circled ones in the image. Note they are all using the same View. Each group name is unique and we created one for each USM mode of SNMPv3.
How to Activate and Configure SNMPv3 - Users

6a. Creating a No Auth No Privacy User
On the left side menu bar locate 'SNMP', 'Users', Click on 'Add' to view this popup. Enter a unique user name, select Engine ID Local, Group Name corresponding to your No Authentication No Privacy group and select Authentication Method None. This assumes you created a NoAuthNoPriv group. Then press Apply.

6b. Creating an Auth No Privacy User
On the left side menu bar locate 'SNMP', 'Users', Click on 'Add' to view this popup. Enter a unique user name, select Engine ID Local, Group Name corresponding to your Authentication No Privacy group. Select MD5 method. Select Authentication Password Plaintext, then enter the password - make a note of it! This assumes you created an AuthNoPriv group. Then press Apply.

6c. Creating an Auth Privacy User
On the left side menu bar locate 'SNMP', 'Users', Click on 'Add' to view this popup. Enter a unique user name, select Engine ID Local, Group Name corresponding to your Authentication Privacy group. Select MD5 method. Select Authentication Password Plaintext, then enter the password - make a note of it! Select Privacy Method DES. Then select Privacy Password Plaintext and enter that password - also make a note of it! This assumes you created an AuthPriv group. Then press Apply. (Note that if your switch supports AES, we only support AES128 at this time)

7. Confirming the new User(s)
After pressing Apply, the new user should appear like the circled ones in the image. Note the group names correspond to the groups you created previously.
How to Save Your Changes
Problem: All the SNMP changes have not been saved. Note the red blinking Save text in the upper right of your web management page.
Solution: follow these steps to
save your SNMP changes.
Procedure: Login to the switch using your web browser. We have found Chrome to work the best - the popup windows do not always work correctly using IE.

1. Saving Changes
On the left side menu bar locate 'Administration', 'File Management', 'Copy/Save Configuration'. Confirm you are saving the running configuration to the startup configuration, then press Apply. There will be an acknowledgement window with a Done button.
NetScanTools is a registered trademark of Northwest Performance Software, Inc.
'NetScanTools Pro', 'NetScanTools Standard', 'NetScanTools LE', 'ipPulse', 'Northwest Performance Software' and 'NetScanTools.com', are trademarks of Northwest Performance Software, Inc.
Any trademarked names mentioned herein are the property of their respective owners.
About Us
Email Us
Call Us
Help & Support Center
General Topics
Purchasing
Other Products
© 2025 Northwest Performance Software, Inc. All Rights Reserved. | Privacy Policy